Finding the best threshold angle for supports depends on your specific 3D printer, but 45° is the safest starting point for most FDM prints.
There is no universal best setting. Your ideal support threshold angle relies heavily on material properties and part cooling capabilities.
Here is a quick baseline for different filaments:
- PLA: With strong cooling fans, PLA can often handle steeper overhangs of 55° to 60°.
- PETG, ABS, ASA, and Nylon: These plastics are prone to sagging or warping and usually require more conservative settings closer to 45°.
You might notice that Bambu Studio defaults to a 30° threshold angle. This setting can confuse users, but it occurs simply because different slicers measure overhangs from varying axes (vertical versus horizontal).
Ultimately, the best angle is the highest incline your printer can handle cleanly for your specific print goal. Always check your slicer’s preview tab to verify the generated structures before starting a print.

What Is Threshold Angle in 3D Printing?
The threshold angle is the specific limit you set in your software to control support generation under an overhang.
When a print layer extends outward without anything underneath it, that is an overhang. If that surface slopes too drastically, gravity pulls the melted filament down, creating a drooping, messy print.
By setting a threshold angle, you give your 3D printer a clear, automated rule. If a surface is steeper than the limit you chose, the software builds a temporary structure underneath it to hold the plastic in place while it cools.
Consider this simple breakdown of how it works in practice:
- The Rule: If your threshold angle is set to 45°, the slicer will usually support surfaces that exceed that limit.
- The Catch: The exact result depends heavily on how your specific software measures the angle—some measure from the vertical axis, while others calculate from the horizontal.
Because different programs calculate this math differently, you must always double-check the slicer preview before printing.
This quick visual check takes only a few seconds, but it is the only way to ensure your supports generate exactly where your model needs them to survive the printing process.
The 45-Degree Rule Explained
In FDM printing, the 45-degree rule is the most popular guideline you will come across. It states that overhangs sloping at 45 degrees or less can usually print safely without added structures.
Why does this work? It is quite simple. At 45 degrees, each new layer still rests on enough of the previous layer to stay securely in place.
This built-in layer support keeps the hot plastic from drooping into thin air. However, you should not treat this rule as an absolute law.
It is simply a safe starting point for finding your optimal support threshold angle.
For example, if you spend time on printer tuning, you can often push past this limit. A well-calibrated machine printing PLA with excellent cooling can sometimes handle 55° or even 60° overhangs smoothly.
On the flip side, you might need to adjust your threshold angle 3D printing settings to be more conservative if your conditions are less forgiving.
You will likely need more support structures if you face:
- Poor part cooling or hot ambient room temperatures
- Excessively high nozzle temperatures
- Flexible or stringy materials like TPU or PETG
- Very fast print speeds that do not allow plastic to harden
Always let your hardware and filament guide your choices. Testing your specific overhang limits is the best way to find out what your printer can actually handle.
Best Support Threshold Angle by Material
Different filaments behave differently when melted and extruded. Because of this, your support threshold angle must match the specific plastic you are printing with.
Materials that cool rapidly can hold their shape over thin air much better than plastics that stay soft. Below is a quick reference table to help you dial in the right settings for your next project.
| Material / Use Case | Safe Starting Point | More Aggressive Setting | Notes |
| PLA | 45° | 55–60° | Good cooling helps overhangs print cleaner. |
| PETG | 40–45° | Around 50° | Watch for curling and stringing. |
| ABS / ASA | 35–45° | 45–50° | Enclosures help warping but may reduce cooling. |
| Nylon | 35–45° | Around 45° | Dry filament is important. |
| Miniatures | 25–35° | Around 40° | Better detail, but more cleanup. |
| Fast prototypes | 45–55° | Around 60° | Less support, but rougher undersides. |
For large parts, engineering prototypes, or production fixtures, a large-format industrial FDM printer with stable chamber control can make overhang performance more predictable.
Let’s break down why these numbers differ so drastically.
Standard Plastics (PLA and PETG)
PLA is highly forgiving. With strong part cooling fans, PLA freezes almost instantly, allowing you to push your threshold angle up to 60°. PETG stays sticky and fluid longer, requiring a more conservative limit to prevent drooping overhangs.
High-Temperature Filaments (ABS, ASA, Nylon)
Materials like ABS and ASA usually require a heated enclosure to prevent warping. This trapped heat stops the plastic from cooling rapidly, meaning steep overhangs will sag. You need more supports here. Nylon also prints best with extra support, and keeping the filament completely dry is mandatory for clean overhangs.
Specialized Use Cases
Your overall print goal also changes the math. Are you printing highly detailed table-top miniatures? Drop your angle to 30° to guarantee every tiny feature is supported perfectly.
If you are just churning out fast prototypes, push the angle up to 55° or 60°. You will save filament and reduce print time, even if the underside looks a little rough.

Bambu Studio Support Threshold Angle: Why 30° Can Be Confusing
Many users feel confused when they first open Bambu Studio. While the broader 3D printing community constantly preaches the standard 45-degree rule, you will immediately notice a 30° default setting in the software.
Why does the Bambu threshold angle seem so different compared to other programs? The confusion comes entirely from how the slicer describes and measures the angle.
Different slicers calculate the math from different starting points. Some measure the overhang starting from the vertical Z-axis, while others measure from the horizontal build plate.
Because of this reverse math, the numbers look completely different even when the physical slope is exactly the same.
Due to these different measurement standards, you should never trust the number alone. The Bambu Studio support threshold angle is simply a mathematical variable, not a guarantee of print success.
To avoid failed prints, always use this simple workflow:
- Select your baseline angle setting.
- Slice your 3D model.
- Thoroughly inspect the support preview tab.
- Look for overhang warnings that lack support structures underneath them.
If you see unsupported floating geometry, adjust the number and slice again.
For Bambu or OrcaSlicer users, do not ask, “Is 30° or 45° correct?” Ask: “Does the preview support the areas that are likely to fail?”
Trusting your eyes over the numeric value is the only reliable way to guarantee a clean, successful print.
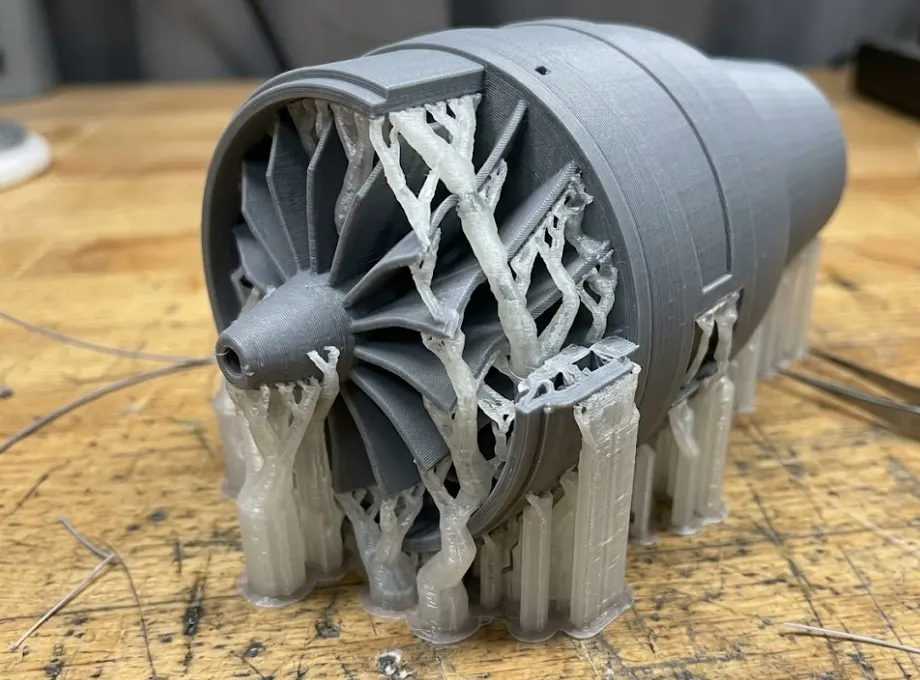
Best Threshold Angle for Tree Supports
What is the best threshold angle for tree supports? The answer is usually the exact same number you use for standard supports.
Tree supports are not a reason to ignore overhang limits. They are simply a different way to reach the same unsupported areas.
These organic structures change the physical shape of the support, not the physics of melting plastic. The threshold angle still controls exactly when your slicer generates them.
Because of this, you should always start with the same general threshold as normal supports. For a standard PLA print, that means starting around 45°.
So, why choose this style? You should use tree supports when you want easier support removal or fewer surface scars. Because they branch out and touch the model only where absolutely necessary, they leave behind a much cleaner surface finish.
If you are printing miniatures or complex organic shapes, use more conservative support settings. Dropping your angle closer to 30° ensures the tree branches catch every tiny, floating detail.
For simple functional parts, you can often raise the threshold angle after testing. If your printer handles steep overhangs well, set the angle higher so tree supports only form under extreme geometry.

How to Find Your Printer’s Real Overhang Limit
Guessing your slicer settings will only get you so far. If you want to discover your real printer limit, you need to test your specific hardware directly.
Every machine handles cooling, movement, and extrusion differently. A standard calibration test is the best way to dial in your threshold angle.
Follow this simple four-step process to find your hardware’s exact capabilities:
- Download an overhang test: Find a standard overhang calibration tower on any popular 3D model repository.
- Turn the support off: Slice the test file completely without supports. You must use your normal filament, print speed, nozzle temperature, and cooling fan settings to get accurate data.
- Analyze the physical results: Once the print finishes, look closely at the underside of the angles. Check exactly where the plastic begins sagging, curling, or becoming visibly rough.
- Adjust your slicer settings: Note the exact degree where the print quality becomes unacceptable. Set your support threshold slightly below that specific failure point.
How does this look in practice? Imagine you print the calibration model using your favorite PLA.
If your PLA looks perfectly clean at 55° but starts drooping into a messy string at 60°, you have found your physical limit. You should set the threshold around 50–55° for real prints.
This quick calibration test completely removes the guesswork from your slicer profile. By finding your exact hardware limitations, you guarantee cleaner overhangs while avoiding unnecessary support structures.
How to Improve Overhangs with Slicer Settings
You can push your printer’s performance even further by tweaking a few key FDM overhang settings in your slicer.

Temperature, Speed, and Cooling
These three settings work together to control how the plastic behaves.
- Lower Nozzle Temperature: Printing at the lower end of your filament’s recommended temperature range means there’s less heat to dissipate, so it solidifies faster.
- Reduce Print Speed: Specifically, slow down the speed for outer walls and overhangs. This gives the cooling fan more time to do its job on each part of the layer.
- Increase Part Cooling: For PLA, cranking the fan up to 100% on overhangs is usually the best move. For PETG or ABS, you may need to experiment to find a sweet spot that doesn’t cause curling or warping.
Layer Height and Line Width
You can use the geometry of the print itself to your advantage.
- Decrease Layer Height: A thinner layer means the overhang steps out a smaller distance from the previous layer. This creates a more stable foundation. For example, a 0.12mm layer will handle an overhang better than a 0.28mm layer.
- Increase Extrusion Width: Printing slightly wider lines (e.g., 0.45mm from a 0.4mm nozzle) creates a bigger “shelf” for the next layer to rest on, improving support.
Wall Order and Adaptive Layers
For the true perfectionist, these advanced settings can make a difference.
- Wall Printing Order: Set your slicer to print walls from the “inside-out.” This ensures the outer perimeter (the overhang itself) is anchored to a fully supported inner wall, increasing its stability.
- Adaptive Layer Height: This powerful feature automatically uses thinner layers only on sloped or curved surfaces, giving you the quality benefits of a small layer height on overhangs without adding massive print time.
Common Overhang Problems and How to Fix Them
Even when you find the perfect threshold angle, you might still encounter print defects. 3D printing requires balancing complex geometry, temperature, and speed.
When an overhang fails, the solution is usually a minor adjustment in your slicer software. Use this quick troubleshooting guide to identify and fix the most common problems.
| Problem | Likely Cause | What to Change |
| Sagging underside | Overhang too steep or cooling too weak | Lower threshold, slow down, improve cooling |
| Upward curling | Too much heat or poor cooling balance | Lower nozzle temperature, slow down, tune fan |
| Rough support scars | Support too close to model | Increase Z distance or tune interface layers |
| Too much support material | Threshold too conservative | Raise threshold after testing |
| Small features break during removal | Support is too dense or too close | Use tree supports, lower density, tune interface |
| Failed corner or edge | Weak cooling or bad orientation | Reorient model or add local support |
Let’s look closer at a few of these mechanical fixes to understand how they help.
If you constantly battle support scars that ruin the underside of your models, check the gap between the actual print and the support structure.
Slightly increasing the Z distance in your slicer creates more breathing room. This makes support removal much easier and saves the surface finish.
You should also tune the support interface layers. A dense interface creates a solid roof for the model to print on, leading to a much cleaner breakaway surface.
What if small details snap off when you pull the supports away? This happens when the generated structure is too rigid.
Try lowering the overall support density so the sacrificial plastic yields easily. Alternatively, switch to tree supports that only touch the model in tiny, isolated spots.
Finally, defects like downward sagging or upward curling almost always trace back to poor temperature management. Adjust your cooling fans and lower your nozzle temperature to help the plastic freeze quickly.
FAQ
What is threshold angle in 3D printing?
The threshold angle is a specific slicer setting that tells your 3D printer when to generate support structures under an overhang. If a surface slopes steeper than the limit you set, the software automatically builds temporary scaffolding beneath it. This prevents melted plastic from drooping in mid-air.
What is the best support threshold angle?
For most standard FDM printing, 45° is a safe and reliable starting point. However, there is no single perfect number. The absolute best threshold angle depends heavily on your specific filament material, nozzle temperature, and the strength of your part cooling fans.
What is the best threshold angle for tree supports?
You should start with the exact same angle you use for normal supports, which is typically around 45°. Because tree supports only change the physical shape of the scaffolding rather than the overhang physics, you can easily adjust the angle later based on your slicer preview and support removal needs.
What is a good Bambu Studio support threshold angle?
Start with the Bambu Studio default setting of 30°, but always review your slicer preview before printing. Because different programs calculate overhang math differently, you should test ranges between 30° and 45° to find what safely supports your specific print goals without wasting filament.
Is the 45-degree rule always correct?
No, it is simply a reliable rule of thumb for standard plastics like PLA. A well-tuned printer with strong cooling can often print overhangs up to 60° without failing. Conversely, flexible or high-temperature materials might need supports well before they reach a 45-degree incline.
How do I reduce support marks on overhangs?
The easiest way to reduce scarring is to increase the Z distance slightly, creating a larger gap between the support and the model. You should also tune your support interface layers, lower the overall support density, or adjust the part orientation to hide unavoidable marks.